Saturday 15 June 2013

Dr Who Galaxy Shoes

I've been on a blogging break. A very, very, very, very......very long blogging break. Why? A combination of stressful Grade 11 Schoolwork & Exams (capitals intended), laziness and warped internet.

I've been doing plenty of craft and D.I.Y, following other peoples blogs, and making a general mess of my bedroom in search of that last bead/hook/paint-brush/fancy paper, I just haven't been blogging about it. Rather than going back and writing posts on all the things I have done I 'm procrastinating and pretending I didn't make them and therefore do not have to blog about them.

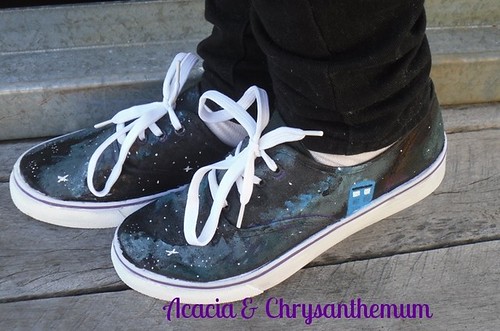
I give you: Doctor Who Galaxy Shoes

SDC10186

SDC10166

 They started off as this (worth $4 from Big W):

SDC10153

There are loads of tutorials out there for Dr Who Shoes, Galaxy Shoes, and Dr Who Galaxy Shoes. So rather than adding another tutorial to the already jam packed internet I am just going to show pretty shots of my shoes and give you links to some very good tutorials I muddled around with.

SDC10168

 I will give you a couple of tips though.

1.) If you don't know who Doctor Who is thats OK. I won't judge you......much. I do suggest you start watching though, it's pretty darn good. Start from the first season though, otherwise it's a tad confusing. Don't watch it at nighttime....especially not the Weeping Angels episode. In fact if you have angel statues in your yard or local park stay away from Doctor Who completely.

2.) Lots of the tutorials suggest using a toothbrush dipped lightly in white paint and flicking it at your shoes to create the star patterns. What they all fail to mention is that in doing so you end up with a nice star pattern over the surrounding table, ground, walls and yourself.

3.) When taping the part of you shoes that you DON'T want paint on, be excessive. To much tape is not a bad thing, it's a good thing and should be wholeheartedly recommended.

SDC10169

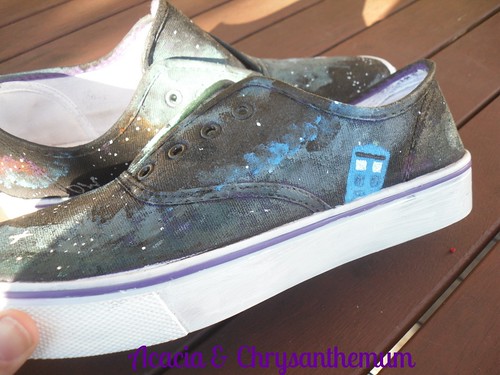
 I am of course not an artist/artistic/able to hold a paint brush the right way up (Not really, but my Tardis is pretty dodgy)

I think they are the perfect Geek Shoes (although I am considering making a Harry Potter pair) and I will probably wear them everywhere until they fall apart :)

I watched this clever YouTube video:  http://www.youtube.com/watch?v=Ny_pl2UvRPc 
I visited these: http://miss-sunday-girl.blogspot.com.au/2012/11/diy-galaxy-shoes.html
                       http://www.leawesome.com/2012/09/diy-galaxy-shoes.html


Wednesday 13 March 2013

DIY Lipgloss

Yep, this is me. Slacking off again. Wait! This time I have a slightly realistic excuse.
Senior EXAMS (Feel the horror sweep over you)
 I still have to pass High school....pass University...Slowly build up working skills until I have a good enough salary to afford Lint Chocolate again (Which I currently 'borrow' from Mum) and then I might have time to blog again....maybe :)

Presently I have Biology leaking out my ears (I'm hilarious) So I took a quick break to make this:

My very own Lip gloss!

SDC10794

My wonderful relatives & friends give me lots of make-up. Unfortunately not all of them suit me, but thanks to my superior Internet surfing skills I found some DIY lip gloss recipe's and muddled them up into my own version. 

Most of the recipe's I found asked for beeswax, which I collected (and melted) from a bee's nest which fell down during our last storm. If you don't have a handy fallen nest around (or the bee's want their nest back!) You can buy it from....um....a shop.

You will need:

 2 teaspoons of beeswax

2 tablespoons  of bath oil

SDC10791


5 drops of an essential oil

A couple of old/unappealing Lipsticks

SDC10788

Instructions:

1.) Melt the oil and beeswax together in a glass bowl in a hot pan of water. Do not allow any water in the oil and beeswax mixture.

2.) Stir in a bit of lipstick/s until you like the colour and brightness. The lip gloss will be a lighter shade on your lips then whilst it is melting. Ensure that the lipstick is completely melted and stirred through.

3.) Add the essential oil to the mixture and stir briefly.

4.) Pour the lip gloss into small containers and leave them with the lid off to cool.

SDC10797


As evidence that I have not been completely slacking off from my craft here is my Mum's Birthday Cake. She requests the exact same dark chocolate cake every year (not that I blame her, its delish!) so this year I decorated with frozen raspberries and her favorite chocolate biscuits. 

SDC10772

I used dark chocolate gnash to 'glue' the biscuits to the cake. It tasted wonderful and looked like a cute little chocolate well.

SDC10784

Ta-da!


Saturday 23 February 2013

Coconut Biscuits

I've been away from my blog for a while, I'm blaming Senior classes, a new school and the obsessive dedicated reading of Beautiful Creatures (I watched the movie today, it was fabulous!). However I have not been slacking off from my craft, just slacking off from blogging about it.

I made this last week, and a double batch vanished within 24hours. They were scummy, light, melt-in-your-mouth flavoursome and impossible to resist.

SDC10753

I am a big fan of coconut, so I made sure they had a very strong coconut-y flavor. They aren't very healthy (Oops!) but I am so in love with their taste, they are going in my 'Fabulous Recipe" folder anyway.

Ingredients

1 cup of self-raising flour
1 1/4 cup of shredded coconut
1 cup of fine sugar
1 room temperature egg
1/3 cup of butter

Step 1.)  Melt the butter in a small saucepan.
Step 3.) Stir the flour, coconut, sugar and egg together in a large bowl.

Step 4.) Pour the butter into the bowl, and form the mixture into little balls. ( If the mixture doesn't come together, try adding a little more melted butter)
Step 5.) Place the balls on a baking paper coated tray. Take a fork and press the biscuits flat.

Step 6.) Cook at 180 degrees until light brown, remove from oven and allow to cool.

Enjoy!

Sunday 27 January 2013

Pistachio Spread

SDC10669

Pistachios are delicious. A wonderful more-ish snack for lazy days when you don't feel like cooking.

Today, I am stuck at home. Why? You might ask. Well, after 3 months of drought, empty rain tanks and stifling heat. We are now enjoying a flood. The large river which runs through the centre of our town has turned into a giant lake.

This does happen several times per year so it's not as if we weren't expecting it. However with school starting tomorrow and our house being on the other side of town, my little brother is behaving as though he just ate a kilo of sugar.

My school is on the same side of town as us, so I still have to go (weeps silently). To cheer myself up I combined two great loves (Pistachios and spreads) to make this:

SDC10670


 I wondered around on the Internet looking for an exciting spread I could make within my minute concentration range....and couldn't find one which appealed to me particularly. Grasping at some key points in all of the recipes I found, I came up with my own delicious version:

In this spread I used:
2 tablespoons of onion
1 garlic clove
1/4 feta cheese (most of the recipes suggested blue cheese, but I didn't have any)
1/2 cup of Greek yogurt
1/2 cup of pistachios
1 teaspoon olive oil

Step 1.
Mince and fry the onion and garlic in olive oil.

Step 2.
Combine the onion & garlic with the yogurt in a food processor. Lightly process then add the feta cheese and pistachios. Process until smooth.

Step 3. Lightly toast some bread and serve with pistachio spread.

Enjoy!

Wednesday 23 January 2013

Honey Bread

SDC10659

I woke up this morning to rain! We have been hoping for rain for weeks. Our lawn was brown, and our geese were grumpy. Now our geese are running around honking, and our water tank is finally filling up.

To celebrate I made Honey Bread. Warm from the oven, and spread with butter it is a delicious rainy day food. Thanks to the hot bothersome weather I haven't been able to do much baking, but now that it's raining I am free to bake at last!

To make Honey Bread you will need:

3/4 cup brown sugar
2 tablespoons honey
1 cup milk
2 cups Self-Raising flour
Oil spray

Step 1.
Grease a bread tin with butter or spray with oil. Set the oven to 180C.

Step 2.
Mix the sugar, honey and milk together. Add the self raising flour and stir until smooth.

Step 3. Pour the bread mixture into the greased bread tin and cook for 30min. Turn the oven off and leave the bread inside for 10-15min.

Slice warm from the oven, spread with butter and eat.

Tip: Honey bread is best eaten the day it is baked.

Tuesday 22 January 2013

DIY Sock Bun

SDC10650


I recently re-organised my clothes cupboard and was un-surprised at my collection of lonely socks. Ah-ha! The sock monster strikes again!

What to do with my all my one-some socks?  The 35C+ weather and my un-tamable long hair (I'm growing it for the formal)  made the decision for me; Sock buns. Easy, suitable and a non-time consuming project.

For this project I used:
A thick, knee-high sock
Scissors
A hot Glue-gun
A pen and ruler

Step No.1
Rule a straight line across the sock, just under the heel. Cut across the line and discard the foot.

SDC10621

Step No. 2
Start rolling your sock up, beginning at the elastic end. The longer your hair the bigger your rolls should be.

SDC10623

 Step No. 3
Fold the leftover edge down, and glue with your hot glue gun (Alternatively you can hand sew it down)
SDC10624

Step No. 4
Turn the roll so that the ragged edge is on the inside.

SDC10635

Then use it to make a super cute bun!

Wednesday 9 January 2013

Mango Smoothie

In my wonderful country town we are currently 'enjoying' a blend of 37C-40C. Thankfully our old house was built with this sort of weather in mind, and our house is staying at a slightly more reasonable temperature.

Whilst I am definitely not basking in the delightful heat, I am happy that I finally get to follow the lead of Miss Indie who has been making an array of smoothies. I have been very impressed by the ingredients she has used, but I'm going to try her Peanut Butter & Jelly recipe another day and stick to an old favourite of mine.

Mango Smoothie
DSC00729

I love mango's. I learnt pretty quickly that it's a hate or love situation, I'm yet to find an in-between-er....So if mango's aren't your thing, steer clear of this recipe because the mango flavour comes out prominently .

You will need:
A blender
Mango cut in chunks and frozen
1/4 cup of milk (I use slightly less)
Frozen berries
 A drizzle of honey/sugar

1.Blend your mango and milk together until smooth.
2. Add honey/sugar to taste
3. Pour into a tall glass and top off with some frozen berries.

DSC00728

Cold, scrummy and healthy!

Saturday 5 January 2013

Statement Collar

DSC00651
 
I love burda. I think it's the coolest fashion magazine for those who like to make their own stuff, rather then buy it.

Unfortunately the rest of the my family, the female side, feel the same way. This is when my Mum pulls rank, and gets to browse it first. Next is whoever happened to be on the scene when my little brother gets the mail.

"Mum! Mum!" (running into sewing room) "Can I read burda after you!" (Pokes tongue out at other sister).

Anyway, the most recent burda (1/2013) had a page on Peter Pan Collars. The brief tutorial shows how to remove a collar from a guy's shirt and make into a cute accessory.

I don't know about anyone else, but my Dad doesn't throw clothes out. He is horrified when Mum threatens to throw out his clothes because they have holes in them. "Throw it out? Are you kidding?That shirt had at least another 10 years in it. The hole isn't even visible from the front."

I didn't even bother asking Dad if he would donate a shirt to me, instead I made my own collar.

DSC00656

I made the collar out of a vintage fabric (donated by Grandma, she bought it 35 years ago) and added a cute bow which I hoarded from the top of a Birthday card. (I may have a compulsive'I could use that one day..." problem, but hey, every other crafty person I know has it too!). Then I coaxed (Tea, Chocolate Sundae and lots of compliments) my Mum into sewing a button loop on for me, and added a little button to the other end.

DSC00666
Cute huh?
To bad I forgot to take step by step instructions. I pinky promise that when I make another (eyeing cute grey fabric in fabric stash) I will do a detailed tutorial.